- Kubernetes Container Orchestration
- Build and Deploy a Spring Boot App on Kubernetes (Minikube)
- Kubernetes Tutorial on Rolling Deployments
In my last post, you learned about the main components of Kubernetes and how you could take advantage of them. In this post, I will explain how to deploy a Java 8 Spring Boot App on a Kubernetes cluster. This will offer you the chance to familiarize yourself with the fundamental concepts of building an application and deploying it on Kubernetes.
Clarification: It doesn’t matter if you have no experience with Spring Boot; you can still follow along using another framework or programming language. With that clarified, let’s get started.
Step 1: Create a ‘Hello Gorillas’ Spring Boot application
My starting point when I want to create a Spring Boot app is https://start.spring.io/. To get started, select Java 8 and Spring Boot 2.0.3, and choose “Web and Spring Actuator.” Click on the “Generate project” button; this will download the new project with its dependencies.

Open the project with your favorite IDE (I use IntelliJ). I will develop a basic Spring Boot application with one endpoint that returns a “Hello Gorillas! We love Kubernetes” message. So, I added the following class called “HelloController” to the project:
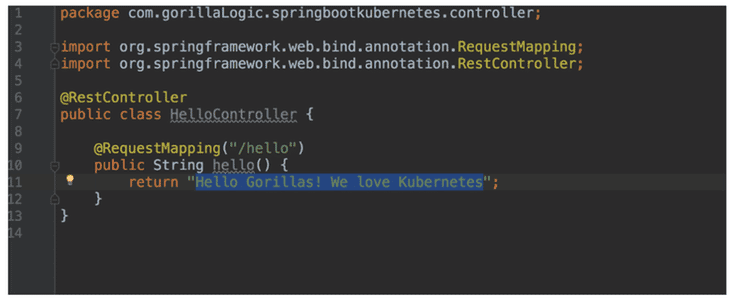
Run the application, open a browser and type in http://localhost:8080/hello; if everything worked well, you should see the message “Hello Gorillas! We love Kubernetes” displayed in your browser .

Step 2: Create a Docker image
The next step after you have the application running is to create a Docker file that has an image of Java 8 and will place the JAR file generated by our application in it. The Docker file should look like this:

As you have probably already guessed, I placed the file inside the root of the application.
We can build a Docker image and push it to a Docker registry by using a Maven plugin. In order to do that, I recommend using the dockerfile-maven-plugin developed by Spotify, since it is very straightforward to use and implement. I will be using this plugin, but if you prefer to create the Docker image in a different way, no worries.
Open the pom.xml file created by the application and add a property called dockerfile-maven-version :

Then, add the plugin to create a Docker image by using Maven (as mentioned above):
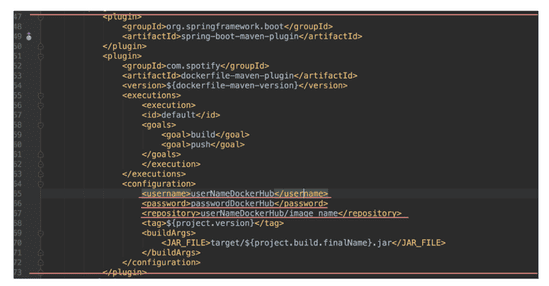
Note: You will need to use your own information for the “username,” “password” and “repository” properties.
Ok, the time to build our image has come. Most IDEs such as IntelliJ, STS, and Eclipse have incorporated plugins or tools that allow us to execute Maven tasks. Since my favorite code editor is IntelliJ, I will take advantage of the tools that this IDE offers. In IntelliJ, there is a Maven Projects tab on the right sidebar. Click on it.

You should see the following options:
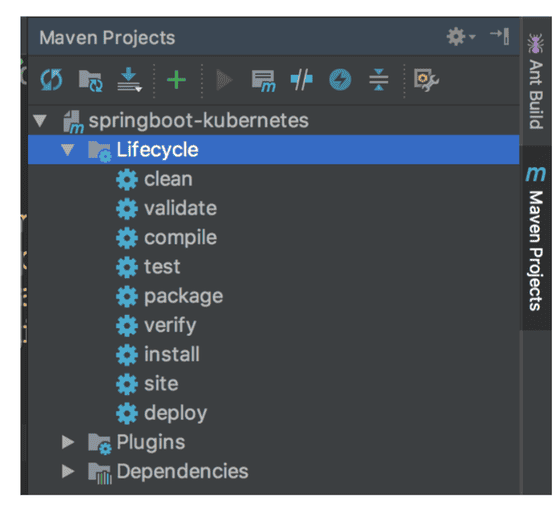
Double click on the “install” option; it will build our project and Docker image. Before you do this, though, make sure that your local Docker is running. If everything was successful, the code editor console should show the following:
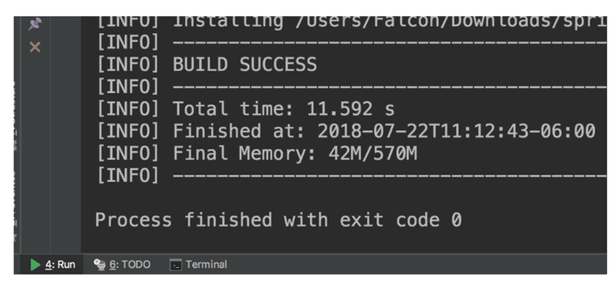
You also can verify that the Docker image was created by using the “docker images” command in the terminal:
docker images

Now that the Docker image has been created, we can push it to the Docker hub. Go to IntelliJ → Maven projects tab → Plugins → Dockerfile → Push.
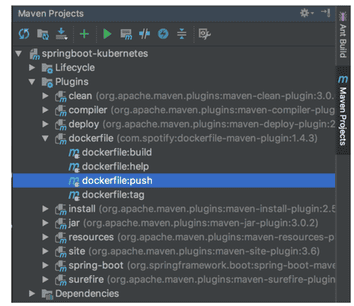
The code editor’s console should show the log message “BUILD SUCCESS,” indicating that the Docker image was pushed successfully.
Step 3: Install Kubernetes locally (Minikube)
According to official documentation (https://kubernetes.io/docs/setup/minikube/):
“Minikube is a tool that makes it easy to run Kubernetes locally. Minikube runs a single-node Kubernetes cluster inside a VM on your laptop for users looking to try out Kubernetes or develop with it day-to-day.”
Go to the Minikube project page on GitHub for information on how to download and install it on Windows, Linux or macOS. We’ll also need Kubectl, which is a command line tool that allows us to manage and deploy applications on Kubernetes. It is also important to mention that Minikube works with Virtual Box by default, but if you want to use another VM driver, you can do so. For more info, click here.
After installing Minikube and Kubectl, we should start the Minikube cluster with the following command:
minikube start
Minikube created a virtual machine, and inside it, a cluster is now running. If everything went well, the console should show the following log messages:

If we want to validate the state of Kubernetes resources in our cluster, we can use Kubernetes Dashboard; the command is “minikube dashboard.” A web browser will be opened with the following dashboard:
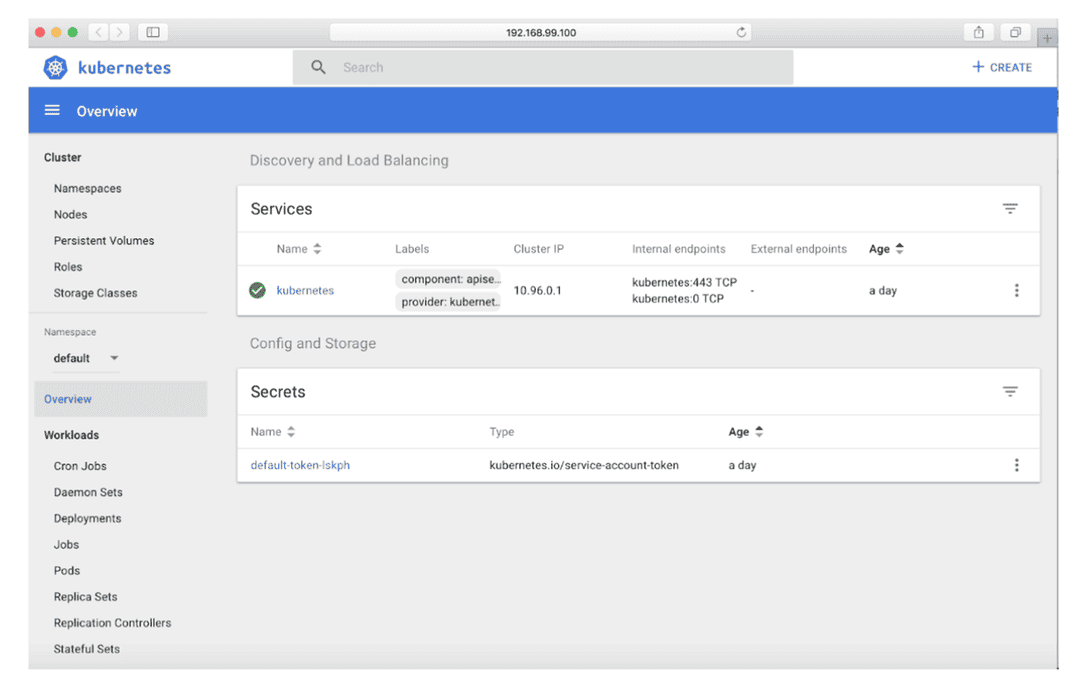
Step 4: Deploy the app on Kubernetes
First, we should check the information of our cluster:
sudo kubectl cluster-infoRemember: The master (API server) manages the cluster. In addition, each node has a Kubelet, which is responsible for communicating with the master.
Now, we are able to see that our master cluster is up and running:

It is important to clarify that Minikube only has one cluster with its respective node. So, we could check our nodes using the command “sudo kubectl get nodes.” The output looks like this:

For this post, we only need a master node, but obviously in production mode we would probably have to use at least three nodes: one for the master, and two nodes for all the things related to application redundancy.
The following step is to deploy our application on Kubernetes. In order to do that, we need to implement a Deployment configuration. With Kubernetes Deployments, you can “describe a desired state in a Deployment object, and the Deployment controller changes the actual state to the desired state at a controlled rate. You can define Deployments to create new ReplicaSets, or to remove existing Deployments and adopt all their resources with new Deployments,” according to the official doc.
In order to create a Kubernetes Deployment, you should run the following command:
sudo kubectl run {DEPLOYMENT_NAME} --image= {YOUR_IMAGE} --port=8080The command “kubectl run” only needs the {DEPLOYMENT_NAME} to work, but if you want to pull a Docker image inside this deployment, you should use the “–image” option, with which you can specify the Docker image to be used.
For this post, I will use the Docker image that was created previously, so the command would be:
sudo kubectl run mykubernetes-springboot --image=glgelopfalcon/springboot_docker_maven:0.0.1-SNAPSHOT --port=8080You can check the deployment that we created by using the command:
sudo kubectl get deploymentsThe console output should look like this:
NAME DESIRED CURRENT UP-TO-DATE mykubernetes-springboot 1 1 1Congratulations, you now have a Deployment containing a Pod that is running the Spring Boot application! Kubernetes created a Deployment and a Pod for us; now we need to know the name of our Pod. To do so, you can use the following command:
sudo kubectl get podsThe console output will be:
NAME READY STATUS mykubernetes-springboot-6f8558698d-k4ns7 1/1 RunningNow that we know the name of our Pod, we can execute commands on it. For example, we could open a bash terminal or show the environment variables:
sudo kubectl exec -ti mykubernetes-springboot-6f8558698d-k4ns7 bash sudo kubectl exec mykubernetes-springboot-6f8558698d-k4ns7 envCurrently, our application isn’t accessible from outside the cluster; it is only running on the Kubernetes cluster. We need to create a “bridge” between our application and the outside world, something that can be done by using a service. Let’s go ahead and create our service, because we want everyone to be able to use our application:
sudo kubectl expose deployment/mykubernetes-springboot --type="NodePort" --port 8080The logic behind the above command is the following: we want to expose our deployment to the world through the NodePort (which will be assigned when the service is created). After you execute the command, a console message will appear: “service ‘mykubernetes-springboot’ exposed,” which means that the application can be accessed from outside the cluster. We now need to know the NodePort of the service that was created. To do this, in addition to obtaining more details about our service, we can use the following command:
kubectl describe services/mykubernetes-springbootThe above command will show us the details about our service:
| Name: mykubernetes-springboot Namespace: default Labels: run=mykubernetes-springboot Annotations: <none> Selector: run=mykubernetes-springboot Type: NodePort IP: 10.109.185.97 Port: <unset> 8080/TCP TargetPort: 8080/TCP NodePort: <unset> 30961/TCP Endpoints: 172.17.0.3:8080 Session Affinity: None External Traffic Policy: Cluster Events: <none> |
It is time to access our application. Remember that the application lives inside a Pod, and we’ve created a service that allows us to access the application from outside the cluster. Use the following command to see which Minikube IP you have:
minikube ipIn my case, the IP is http://192.168.99.100/ and the NodePort is 30961. Go to your favorite browser and type: http://192.168.99.100:30961/hello. You can see that the application is running and can be accessed from outside the Kubernetes cluster:

You rock! You have turned a simple Java Spring Boot app into an application running on Kubernetes.
Conclusion
We implemented and deployed our application on the Kubernetes cluster; in addition, we used Kubectl to execute commands on the cluster. You should now have a basic understanding of how Kubernetes works, so feel free to create more deployments and communicate with them by using services.