To overcome this and other challenges of RESTful APIs, Meta introduced GraphQL in 2015. GraphQL is a flexible, strongly-typed query language used to deliver data to mobile and web applications. It enables front-end developers to query the database, without requiring many changes to the back-end.
In this blog, we’ll explore how Rails works with GraphQL by creating a simple API without using RESTful API.
Let’s get started!
First—how does GraphQL work?
GraphQL works with a single endpoint, which means that you can request data from multiple resources with one end point, you have control of the response, and you will get just the information you were looking for.
GraphQL has two common operations:
• Query: used to fetch data, which means read-only
• Mutation: used as the write method (create, update, delete) followed by a fetch
To use GraphQL, you need:
• Rails 7
Step 1: Create and set up the project
• Run the rails creation command:
rails new rails-graphql• Install the GraphQL gem:
gem install graphql• Add the gem to the Gemfile:
# Use GraphQL for API
gem "graphql"
• Run the ‘bundle install’ command.
• Then run the graphql installation:
rails g graphql:installWhat does the graphql command do?
This command creates all the structure and data types that we need to start working with GraphQL, including:
| Schema file | Contains the structure of our GraphQL instance and some configuration methods |
|---|---|
| Query type file | Contains our queries—as many as we want to create |
| Mutation type file | Contains all the mutations we want |
| Mutation folder file | Contains the method of each of those mutations |
| Arguments | Parameters we want to receive in an action (mutation or query) |
| Fields | Attributes we want to return |
The command also creates another endpoint to test our graphql endpoint in the development environment.
We can test the command actions by running the server and the site:
http://localhost:3000/graphiql

Step 2: Create the models
• Create the main model:
rails generate model Posts author title body:text• Create the associate model:
rails generate model Comments author body:text post:references
• Run the migrations:
rails db:migrate• Add the association in the post model file:
has_many :comments, :dependent => :delete_all


accepts_nested_attributes_for :comments, allow_destroy: true
Step 3: Create the GraphQL models
• Create the post model:
rails g graphql:object postThis will generate the PostType file inside the `graphql/types` folder, where we can see the fields that we will return when requested for a post model.
• Create the comment model:
rails g graphql:object comment• Add the associations inside the type files comment_type file:
field :post, Types::PostType• The Post_type file we need to add is:
field :comments, [Types::CommentType]The files should look like this:
post_type:
module Types
 class PostType < Types::BaseObject
   field :id, ID, null: false
   field :author, String
   field :title, String
   field :body, String
   field :comments, [Types::CommentType]
   field :created_at, GraphQL::Types::ISO8601DateTime, null: false
   field :updated_at, GraphQL::Types::ISO8601DateTime, null: false
 end
end
comments_type:
module Types
 class CommentType < Types::BaseObject
   field :id, ID, null: false
   field :author, String
   field :body, String
   field :post_id, Integer, null: false
   field :post, Types::PostType
   field :created_at, GraphQL::Types::ISO8601DateTime, null: false
   field :updated_at, GraphQL::Types::ISO8601DateTime, null: false
 end
end
Step 4: Create the first mutation
• Generate the mutation:
rails g graphql:mutation create_postThis command creates a new file inside of the graphql/mutations folder and adds the new mutation inside of the mutation_type file.
• Generate the argument files of each model:
Post:
rails g graphql:input postComment:
rails g graphql:input commentThis will generate the input type files used for the mutation arguments. We can add all the validations that we need here.
• Add the comment input type inside the post input type to create comments at the same time that we create a post:
argument :comments, [Types::CommentInputType], required: falseThis can be useful when you want to create models associated with the same mutation all at once.
The files should look similar to this:
post _input_type:
module Types
 class PostInputType < Types::BaseInputObject
   argument :id, ID, required: false
   argument :author, String, required: true, validates: { length: { maximum: 50, minimum: 4 } }
   argument :title, String, required: true, validates: { length: { maximum: 50, minimum: 10 } }
   argument :body, String, required: true
   argument :comments_attributes, [Types::CommentInputType], required: false
   argument :created_at, GraphQL::Types::ISO8601DateTime, required: false
   argument :updated_at, GraphQL::Types::ISO8601DateTime, required: false
 end
end
comment_input_type:
module Types
 class CommentInputType < Types::BaseInputObject
   argument :id, ID, required: false
   argument :author, String, required: true, validates: { length: { maximum: 50, minimum: 4 } }
   argument :body, String, required: true
   argument :post_id, Integer, required: false
   argument :created_at, GraphQL::Types::ISO8601DateTime, required: false
   argument :updated_at, GraphQL::Types::ISO8601DateTime, required: false
 end
end
• Create the mutation, adding the fields, arguments, and the solve method. The file should be similar to this:
module Mutations
 class CreatePost < BaseMutation


   field :post, Types::PostType, null: true
   field :errors, [String], null: false


   argument :post_input, Types::PostInputType, required: true


   def resolve(post_input:)
     post = Post.new()
     post.assign_attributes(post_input.to_h)
     if post.save
     {
       post: post,
       errors: [],
     }
     else
     {
       post: nil,
       errors: post.errors.full_messages,
     }
     end
   end
 end
end
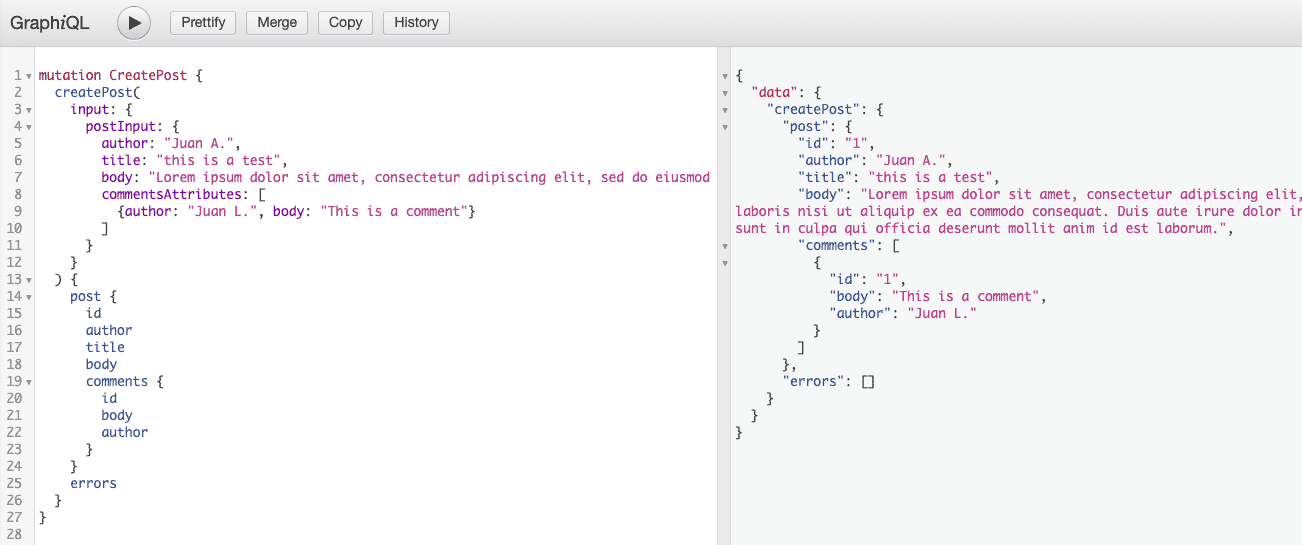
• Now we can test it:
mutation CreatePost {
 createPost(
   input: {
     postInput: {
       author: "Juan A.",
       title: "this is a test",
       body: "Lorem ipsum dolor sit amet, consectetur adipiscing elit, sed do eiusmod tempor incididunt ut labore et dolore magna aliqua. Ut enim ad minim veniam, quis nostrud exercitation ullamco laboris nisi ut aliquip ex ea commodo consequat. Duis aute irure dolor in reprehenderit in voluptate velit esse cillum dolore eu fugiat nulla pariatur. Excepteur sint occaecat cupidatat non proident, sunt in culpa qui officia deserunt mollit anim id est laborum.",
       commentsAttributes: [
         {author: "Juan L.", body: "This is a comment"}
       ]
     }
   }
 ) {
   post {
     id
     author
     title
     body
     comments {
       id
       body
       author
     }
   }
   errors
 }
}
Step 5: Create the first query
• Create the query in the query_type file. We need to add the field and also the arguments and the method to resolve it, like this:
field :posts, [Types::PostType] do argument :author, String, required: false argument :title, String, required: false end def posts(author:, title:) posts = Post.all if author posts = posts.where(‘author LIKE :author’, author: author) end if title posts = posts.where(‘title LIKE :title’, title: title) end posts end
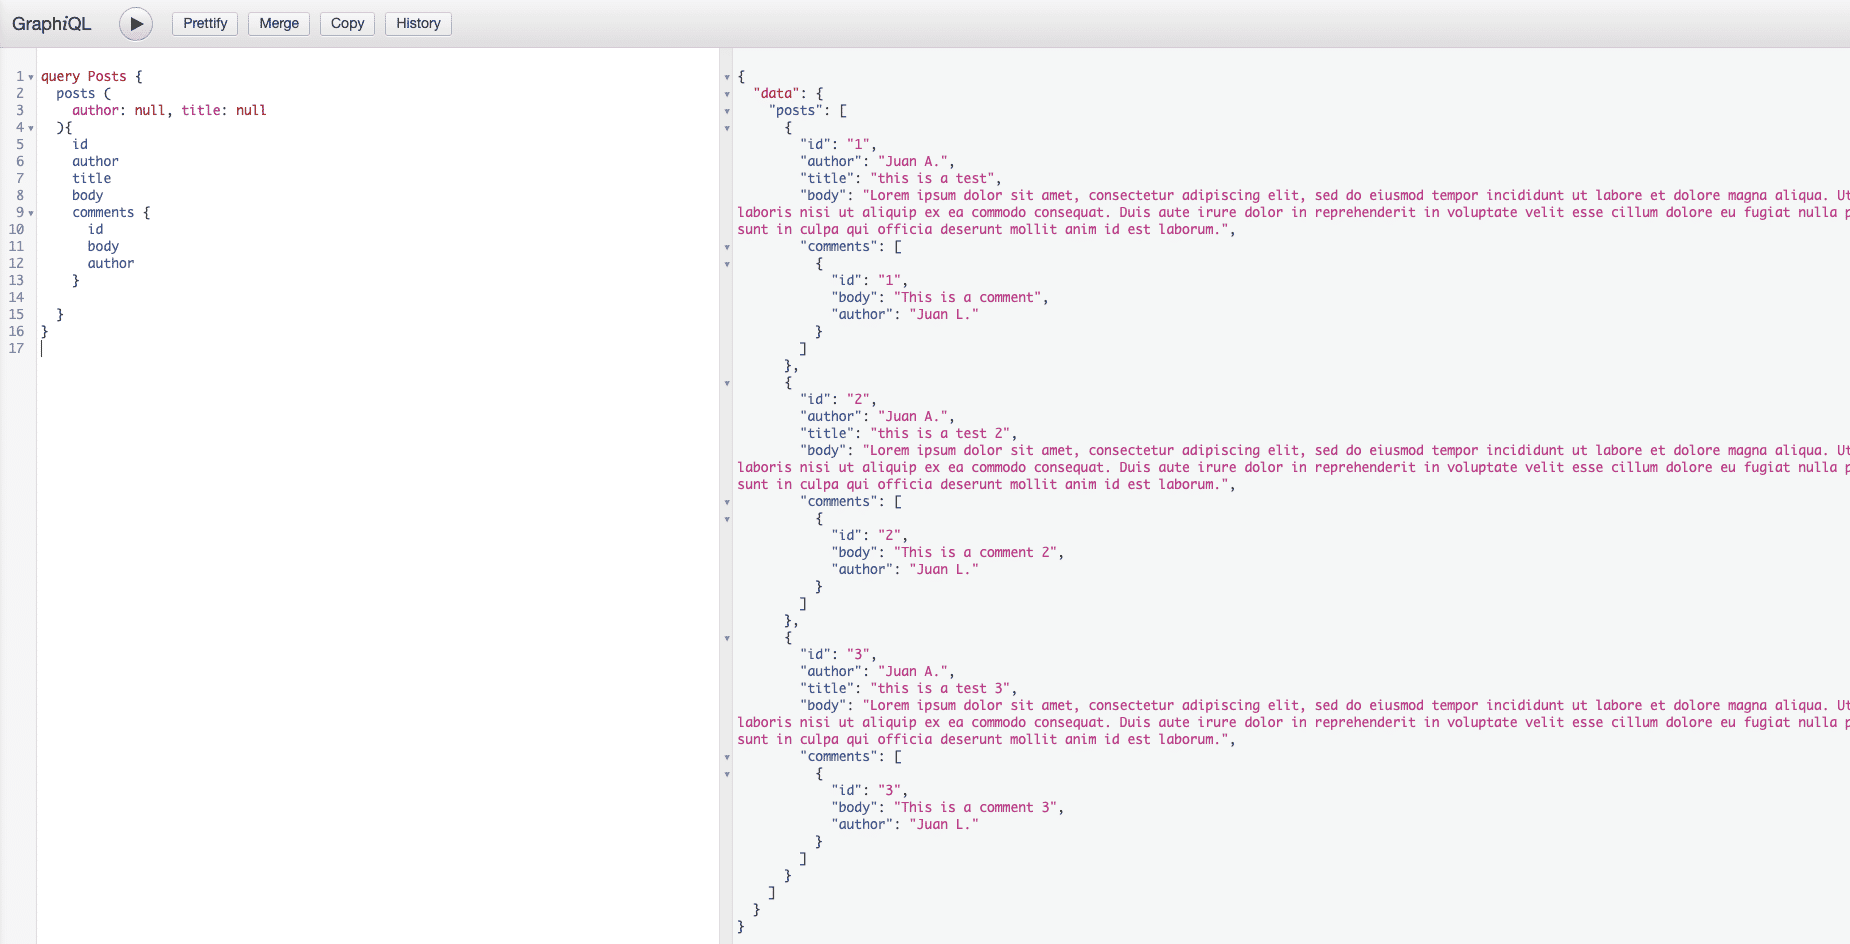
• Now we can test it:
query Posts {
 posts (
   author: null, title: null
 ){
   id
   author
   title
   body
   comments {
     id
     body
     author
   }
 }
}
Step 6: Create a query by id
• Add query into the query file, like this:
field :post, Types::PostType do argument :id, ID, required: true end def post(id:) Post.find id end
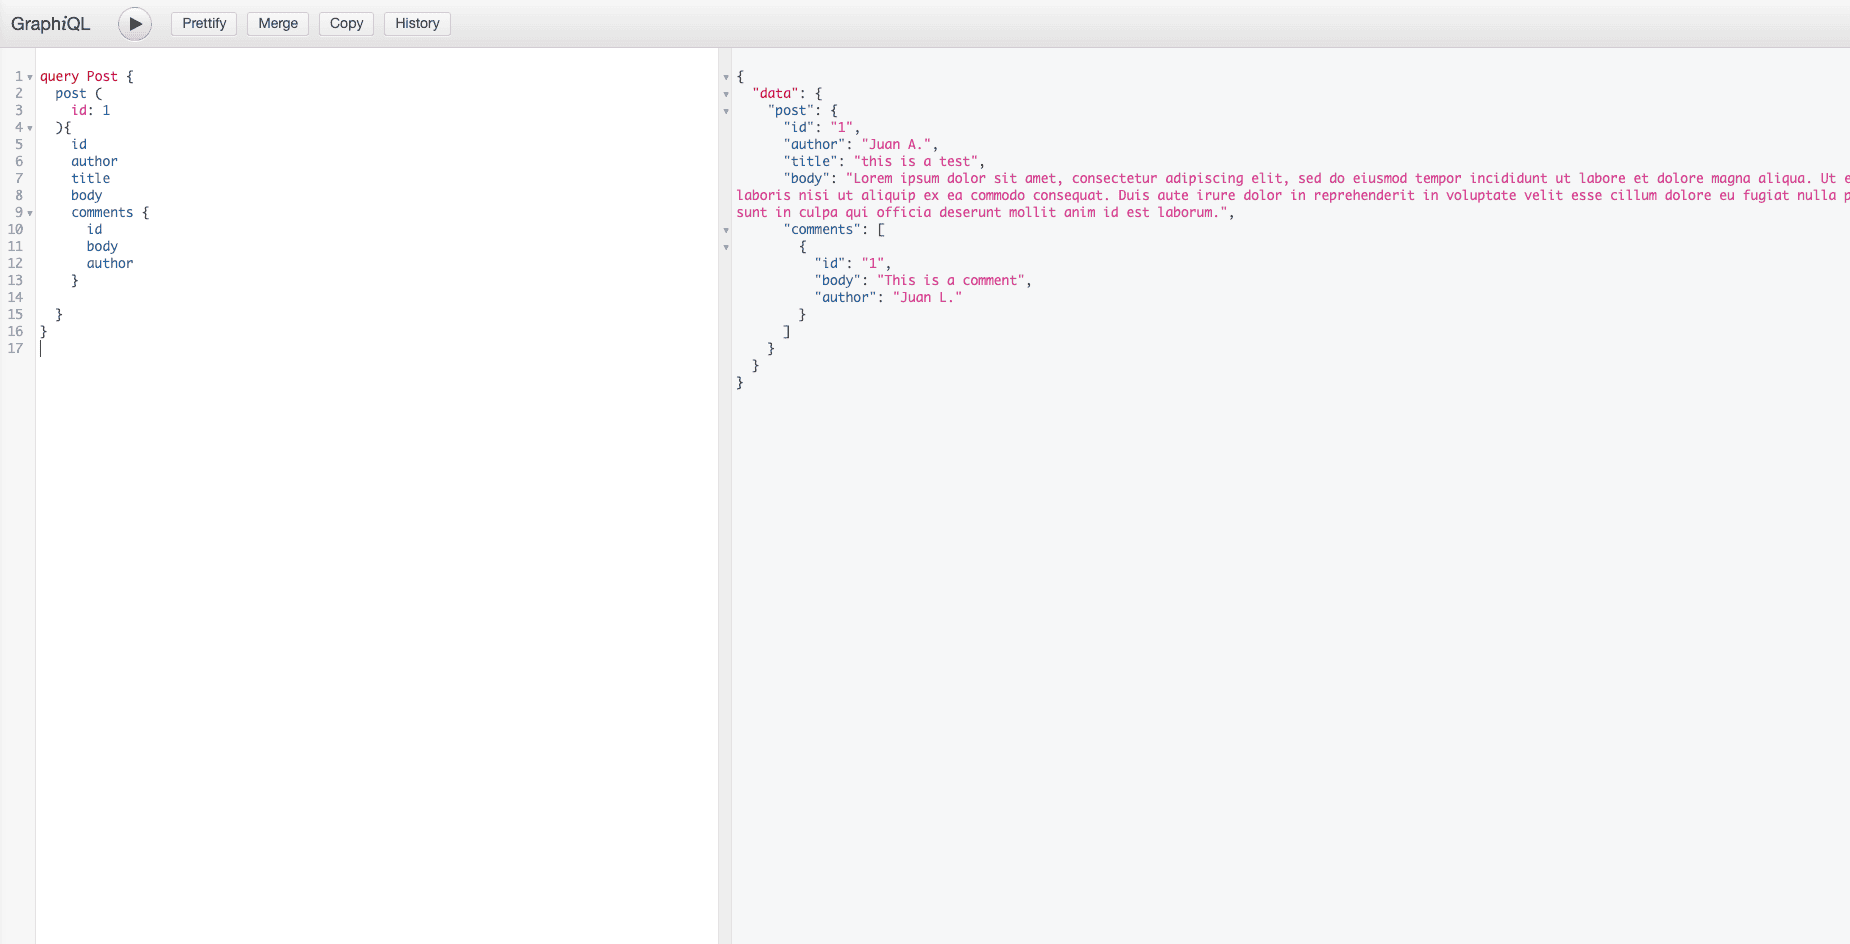
• Now we can test it:
query Post {
 post (
   id: 1
 ){
   id
   author
   title
   body
   comments {
     id
     body
     author
   }
 }
}
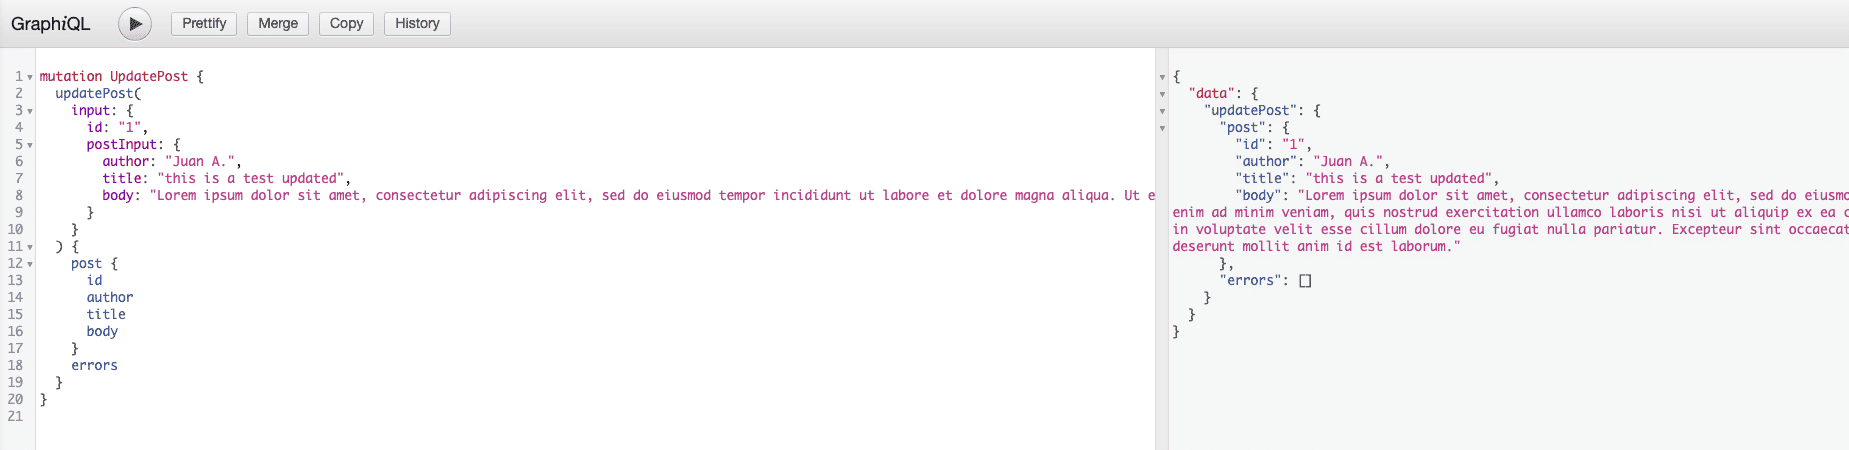
Step 7: Create the updated mutation
• Generate the mutations:
rails g graphql:mutation update_postrails g graphql:mutation delete_post
• Update post mutation
module Mutations
 class UpdatePost < BaseMutation
   field :post, Types::PostType, null: true
   field :errors, [String], null: false


   argument :id, String, required: true
   argument :post_input, Types::PostInputType, required: true


   def resolve(id:, post_input:)
     post = Post.find id
     post.assign_attributes(post_input.to_h)
     if post.save
     {
       post: post,
       errors: [],
     }
     else
     {
       post: nil,
       errors: post.errors.full_messages,
     }
     end
   end
 end
end
A closer look: comparing a RESTful API and a GraphQL API
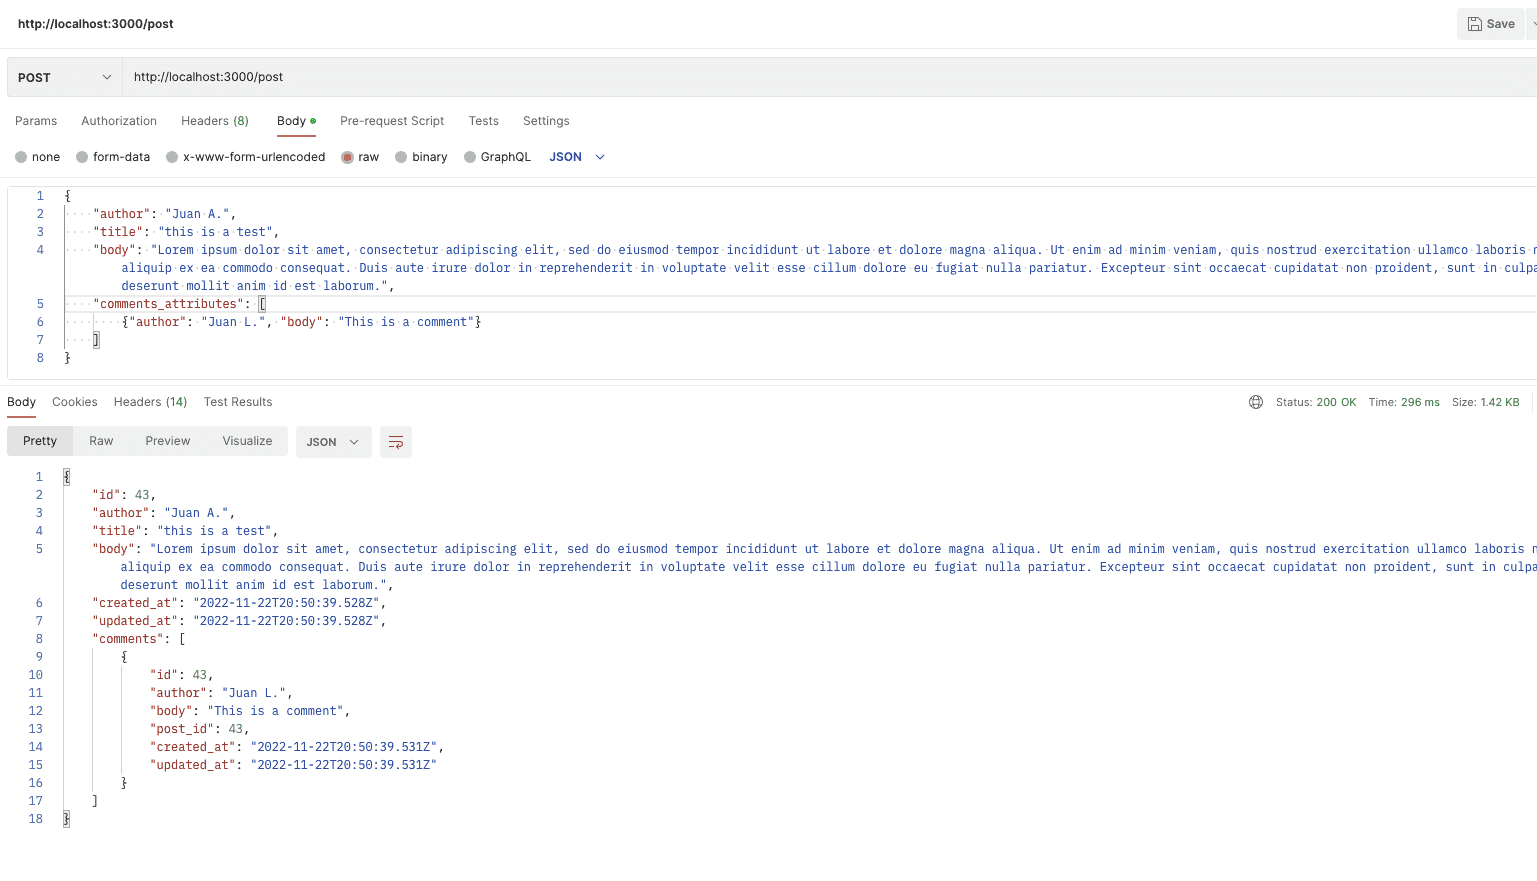
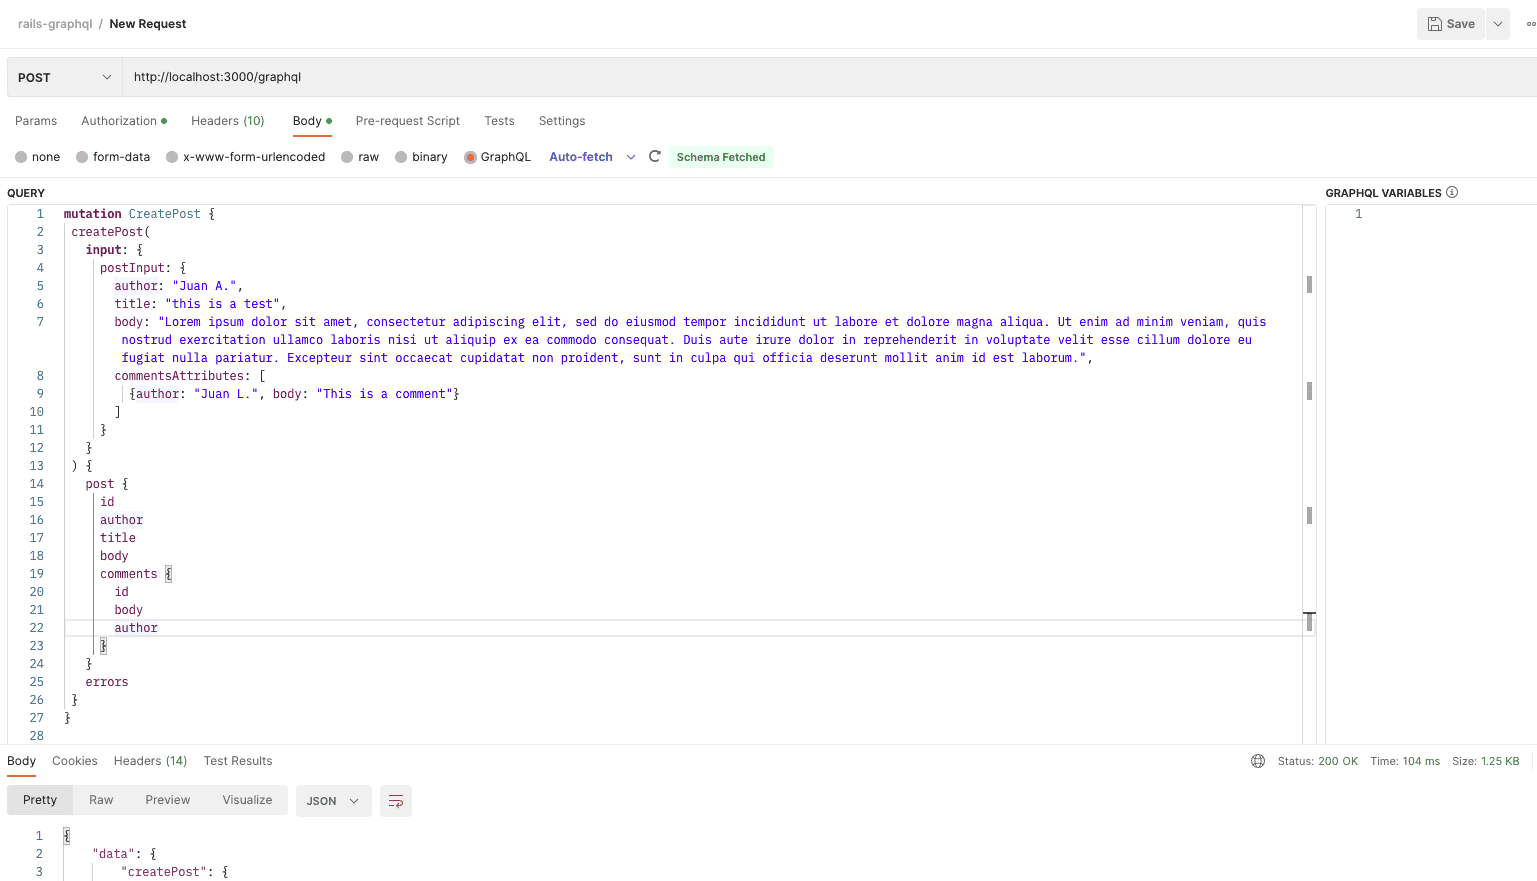
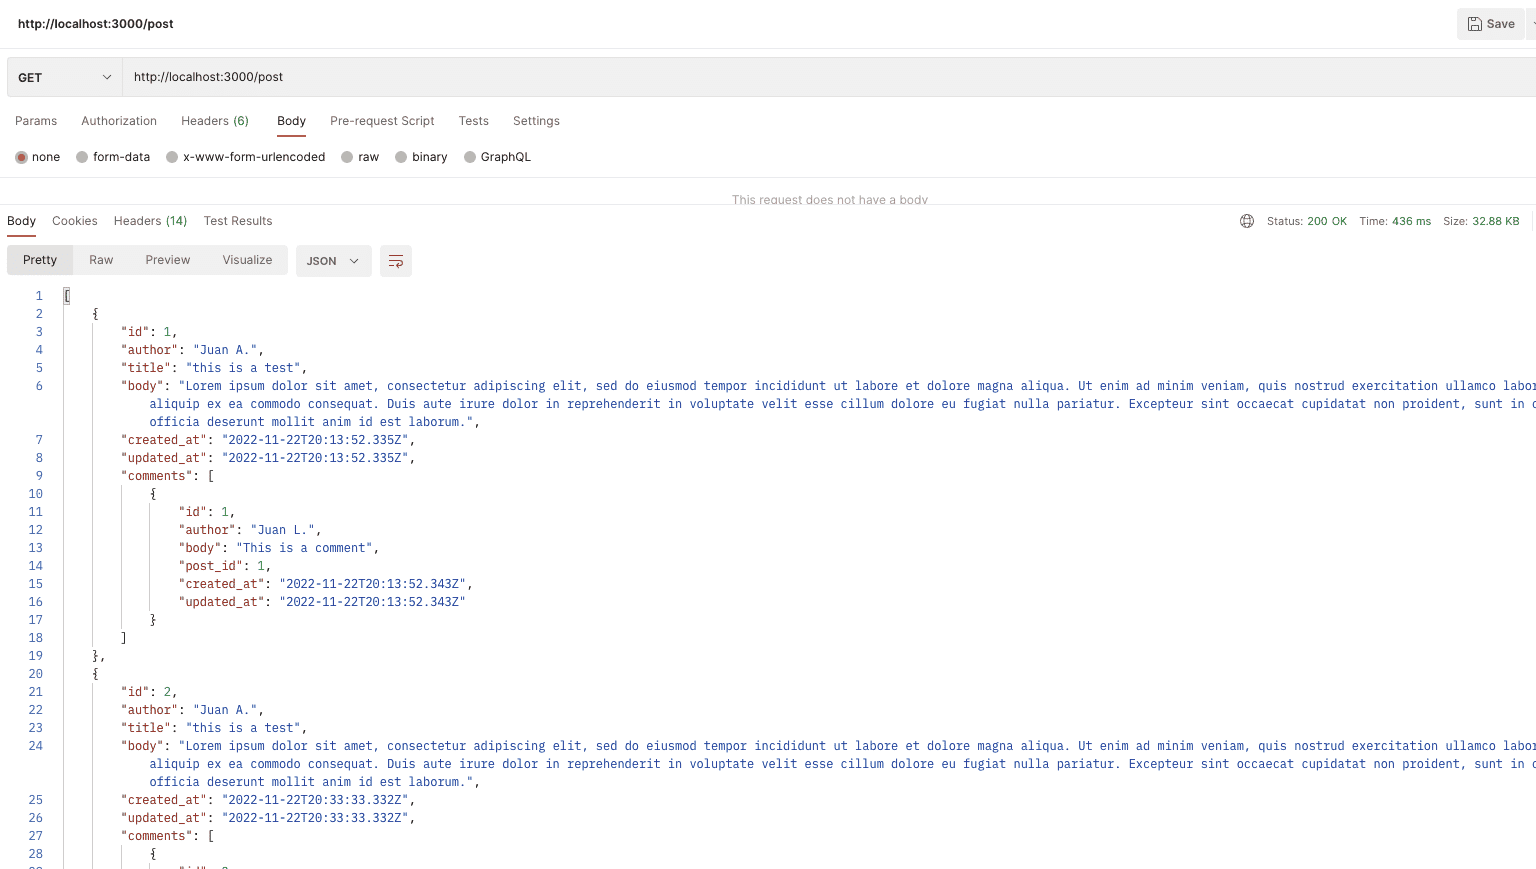
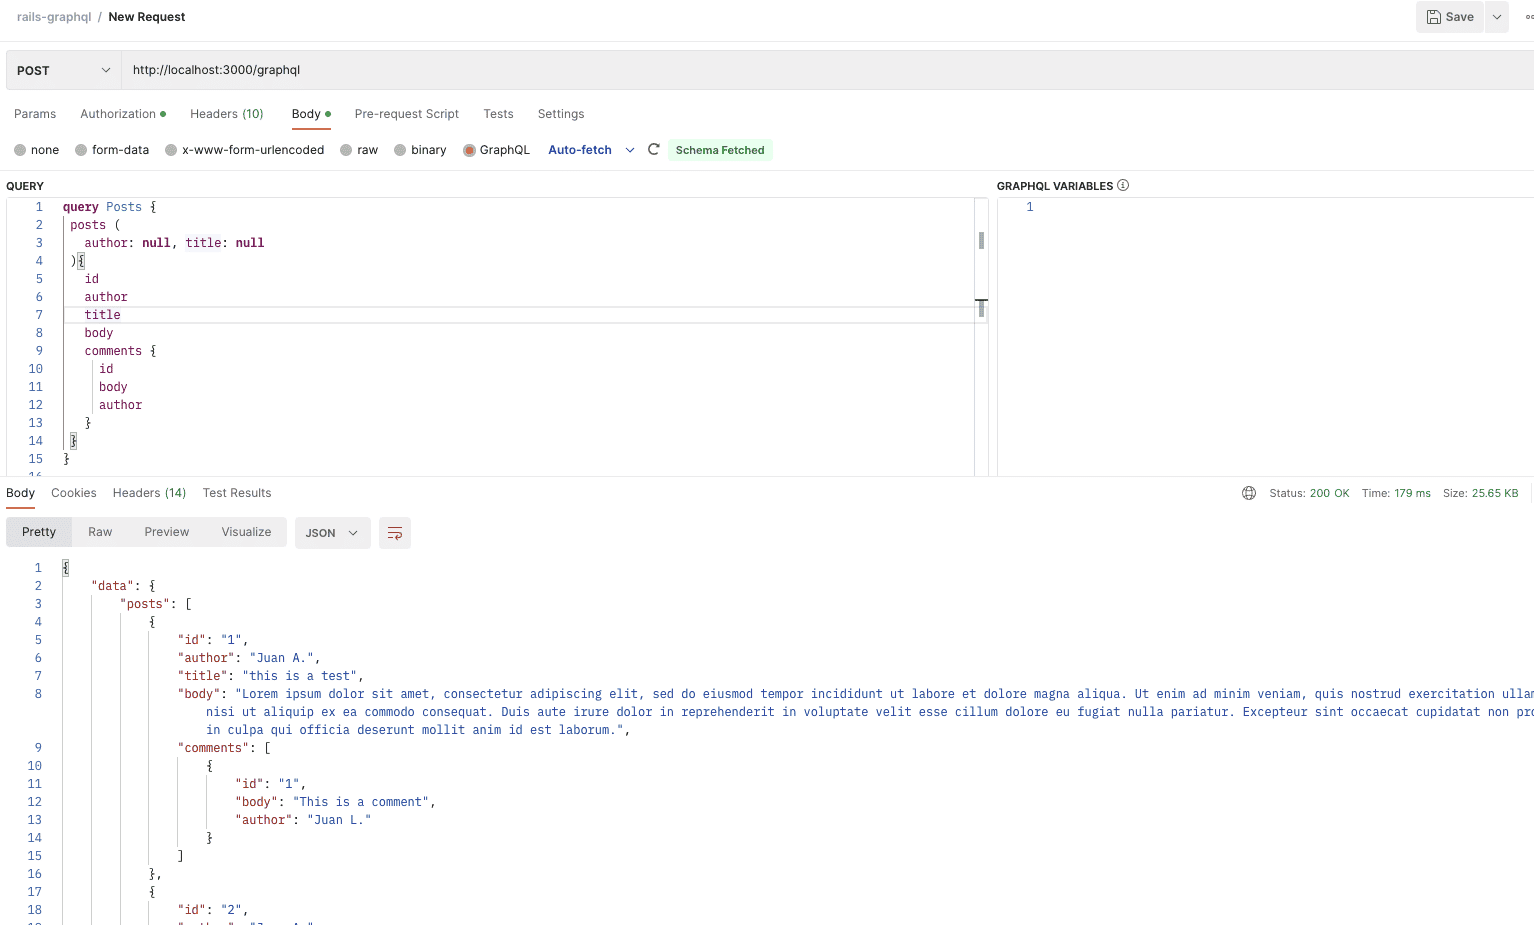
It’s informative to compare the performance of a GraphQL API with a similar RESTful API. In the examples below, we’ve used a method on the post controller to compare the two approaches:
Create post with Rest:
Create post with GraphQL:
Get post with Rest:
Get post with GraphQL:
Learn more about Rails and GraphQL
Now that you’ve seen how simple it is to use GraphQL with Rails—and how efficient it is compared to RESTful APIs–I hope you’ll want to learn more and explore how this method can help you in your Rails projects going forward.