
How to Build a Face Recognition App in iOS Using CoreML and Turi Create Part 2
Building the Back End
In this second post on how to build a face recognition app in iOS, we are going to focus on building the server and all the logic necessary to create the machine learning model and communicate with the app.
One of the most common problems in machine learning is face recognition. This is due in large part to the complexity of the task; if you think about it, face recognition is a combination of two problems:
1. Detecting a face in an image.
2. Gathering enough information to accurately identify the person.
We decided to solve the first problem by using Apple Vision, a tool that detects human faces in an image or a set of images (video). The second step was solved on the back end by using a well-studied machine learning problem: image classification. Supervised image classification is the process of taking a known set of images (classes), and training a model by using examples of those classes. In our project, we were able to gather multiple images of a person, assign an ID (label) to this person, and use that information to train a model.
On the back end, we needed to create a web application that met the following requirements:
1. Exposing an endpoint to register a user.
2. Training a new model every time a new user is registered.
3. Exposing an endpoint where the current model information can be fetched.
4. Exposing the model files to be downloaded.
Of the above requirements, number two defined the programming language we needed to use on our back end, since most of the tools for machine learning are meant to be used in a Python environment. For this reason, we used Flask, a Python microframework that allowed us to set up a web API in a matter of minutes. That means steps number one, three and four are going to be solved in this article using Flask, and number two will be covered by Turi Create.
Enough talking; let’s get started!
Installing Dependencies
Installing Python 3
First, we need to install Python 3. There are several ways to accomplish this; if you are using a Mac, there is a good chance you already have “homebrew” installed. If that’s not the case, though, you can open your terminal and enter this command:
/usr/bin/ruby -e "$(curl -fsSL https://raw.githubusercontent.com/Homebrew/install/master/install)"Now we can install Python 3 using homebrew:
brew install python
Installing project dependencies
These are the dependencies that are necessary for our project, and they can be installed in a Python virtual environment. You can learn more about Python virtual environments here.
pip3 install -U turicreate==4.3.1
pip3 install flask-uploads
pip3 install Flask-SQLAlchemy
pip3 install flask-marshmallow
pip3 install marshmallow-sqlalchemy
We are using some extensions for Flask; in this case, “flask-uploads” will help us upload files to the server. We will maintain an SQLite database using “SQLAlchemy,” and “Flask-marshmallow” will make it easier to serialize and deserialize database objects.
Creating a Flask App
Let’s create a folder called “app.” Inside the folder, create a Python file called “app.py.” Open the file using your favorite code editor and add these lines to the file:
from flask import Flask, request, jsonify
from flask_uploads import UploadSet, IMAGES, configure_uploads
from flask import make_response
from flask_sqlalchemy import SQLAlchemy
from flask_marshmallow import Marshmallow
import turicreate as tc
import sys
from queue import Queue
import os
import uuid
import logging
from flask import send_from_directory
import threading
from marshmallow import fields
from marshmallow import post_load

app = Flask(__name__)
if __name__ == "__main__":
    # Only for debugging while developing
    app.run(host='0.0.0.0', debug=True)

#configure logging
logging.basicConfig( level=logging.DEBUG,
                     format='[%(levelname)s] - %(threadName)-10s : %(message)s')
We have just initialized the app; now, let’s configure a destination folder for our uploads (images).
#configure images destination folder
app.config['UPLOADED_IMAGES_DEST'] = './images'
images = UploadSet('images', IMAGES)
configure_uploads(app, images)
It’s time to set up the database.
#configure sqlite database
basedir = os.path.abspath(os.path.dirname(__file__))
app.config['SQLALCHEMY_DATABASE_URI'] = 'sqlite:///' + os.path.join(basedir, 'facerecognition.sqlite')
db = SQLAlchemy(app)
ma = Marshmallow(app)
In the database, we will store users and models. Note that there’s a difference between a model stored in the database and the Core ML model file; the model table consists of a version, URL, and users, and the version will be increased every time a new model is trained. That way, we can keep track of the model versions and download the newest ones with the app. The URL points to the Core ML model file, and the “users” column contains the users that can be identified using the Core ML model. This may seem kind of confusing now, but it will be clearer once you read the request response when fetching the model information. Let’s set up the database tables:
#model/users is a many to many relationship,  that means there's a third #table containing user id and model id
users_models = db.Table('users_models',
                        db.Column("user_id", db.Integer, db.ForeignKey('user.id')),
                        db.Column("model_id", db.Integer, db.ForeignKey('model.version'))
                        )
# model table
class Model(db.Model):
    version = db.Column(db.Integer, primary_key=True)
    url = db.Column(db.String(100))
    users = db.relationship('User', secondary=users_models)

# user table
class User(db.Model):
    id = db.Column(db.Integer, primary_key=True)
    name = db.Column(db.String(300))
    position = db.Column(db.String(300))

    def __init__(self, name, position):
        self.name = name
        self.position = position

#user schema
class UserSchema(ma.Schema):
    class Meta:
        fields = ('id', 'name', 'position')
#model schema
class ModelSchema(ma.Schema):
    version = fields.Int()
    url = fields.Method("add_host_to_url")
    users = ma.Nested(UserSchema, many=True)
    # this is necessary because we need to append the current host to the model url
    def add_host_to_url(self, obj):
        return request.host_url + obj.url

#initialize everything
user_schema = UserSchema()
users_schema = UserSchema(many=True)
model_schema = ModelSchema()
models_schema = ModelSchema(many=True)
db.create_all()
The database is ready. Now, let’s add the default error handlers:
#error handlers
@app.errorhandler(404)
def not_found(error):
    return make_response(jsonify({'error': 'not found'}), 404)

@app.errorhandler(400)
def not_found(error):
    return make_response(jsonify({'error': 'bad request'}), 400)
It’s time to create the register endpoint; to create a new user, the only necessary field is the name. The position and photos are optional.
#register user
@app.route("/gorillas/face-recognition/api/v1.0/user/register", methods=['POST'])
def register_user():
    if not request.form or not 'name' in request.form:
        return make_response(jsonify({'status': 'failed', 'error': 'bad request', 'message:' : 'Name is required'}), 400)
    else:
        name = request.form['name']
        position = request.form.get('position')
        if position is None:
            position = ""
        newuser = User(name, position)
        db.session.add(newuser)
        db.session.commit()
        if 'photos' in request.files:
            uploaded_images = request.files.getlist('photos')
            save_images_to_folder(uploaded_images, newuser)
        return jsonify({'status' : 'success', 'user' :  user_schema.dump(newuser).data })

#function to save images to image directory
def save_images_to_folder(images_to_save, user):
    for a_file in images_to_save:
        # save images to images folder using user id as a subfolder name
        images.save(a_file, str(user.id), str(uuid.uuid4()) + '.')

    # get the last trained model
    model = Model.query.order_by(Model.version.desc()).first()
    if model is not None:
        # increment the version
        queue.put(model.version + 1)
    else:
        # create first version
        queue.put(1)
At this point, you may have noticed two things:
1. We are saving the user photos in a subfolder using the user ID as the name of the folder. The folder structure will look like this after new users are inserted.
2. We are referring to a queue variable in the “save_images_to_folder” function. After the user has been saved, we append a new model version to a queue that will be processed by a worker thread. We don’t want multiple training tasks occurring at the same time since the training process requires a lot of processing and RAM. Additionally, the training process runs on a different thread because there’s no reason to block the response as the user waits for the training process to finish. As the training process could take anywhere from minutes to hours, depending on the data, it makes sense to deliver the success response before the training is done.
Now, let’s add the remaining endpoints and configure the queue and thread at the end of the file.
An endpoint is needed to request the current model version information:
@app.route("/gorillas/face-recognition/api/v1.0/model/info" , methods=['GET'])
def get_model_info():
    models_schema.context['request'] = request
    model = Model.query.order_by(Model.version.desc()).first()
    if model is None:
        return make_response(jsonify({'status': 'failed', 'error': 'model is not ready'}), 400)
    else:
        return jsonify({'status' : 'success', 'model' : model_schema.dump(model).data})
Now we need an endpoint to serve the trained Core ML models:
#serve models
@app.route('/models/')
def download(filename):
    return send_from_directory('models', filename, as_attachment=True)
Next is the training function:
def train_model():
    while True:
        #get the next version
        version = queue.get()
        logging.debug('loading images')
        data = tc.image_analysis.load_images('images', with_path=True)

        # From the path-name, create a label column
        data['label'] = data['path'].apply(lambda path: path.split('/')[-2])

        # use the model version to construct a filename
        filename = 'Faces_v' + str(version)
        mlmodel_filename = filename + '.mlmodel'
        models_folder = 'models/'

        # Save the data for future use
        data.save(models_folder + filename + '.sframe')

        result_data = tc.SFrame( models_folder + filename +'.sframe')
        train_data = result_data.random_split(0.8)

        #the next line starts the training process
        model = tc.image_classifier.create(train_data, target='label', model='resnet-50', verbose=True)

        db.session.commit()
        logging.debug('saving model')
        model.save( models_folder + filename + '.model')
        logging.debug('saving coremlmodel')
        model.export_coreml(models_folder + mlmodel_filename)

        # save model data in database
        modelData = Model()
        modelData.url = models_folder + mlmodel_filename
        classes = model.classes
        for userId in classes:
            user = User.query.get(userId)
            if user is not None:
                modelData.users.append(user)
        db.session.add(modelData)
        db.session.commit()
        logging.debug('done creating model')
        # mark this task as done
        queue.task_done()
Finally, we configure the queue and the thread:
#configure queue for training models
queue = Queue(maxsize=0)
thread = threading.Thread(target=train_model, name='TrainingDaemon')
thread.setDaemon(False)
thread.start()
Our application is ready; we can proceed to test it locally. Open your terminal, navigate to the app folder, and execute the following command:
FLASK_APP=app.py FLASK_DEBUG=1 flask runYou’ll get an output similar to this:

If everything is working fine, open your browser and enter http://127.0.0.1:5000. You should get a response like this:

This is fine; we haven’t defined a custom response for “/”. Flask detected this and returned the custom response we defined in the application file using the 404 error handler.
Adding negative results to the application
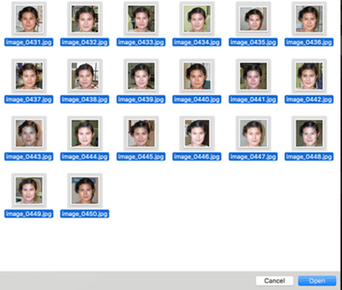
We will register negative results on the back end. This is important because we need to provide a default value when a face is not detected in the model. The model, instead of returning nothing, will return the first available value. If we know the negative values, we can omit them from the results in the iOS application; that way, every time a user is not found, they won’t see another name. To do this, we downloaded a dataset of twenty different people, cropping the images to expose only the face of each person. The result looked like this:

Using Postman, we called the register endpoint using a very distinctive name, making sure to add the photo parameters as a file and choose the cropped images. We called this result “Negative Male.”

If you look at your terminal, the training process should have started. If everything is fine, you should get this error:

The error is very descriptive: you need at least two faces to start the training process. Stop Flask by using ctrl+c and start it again. Let’s go ahead and add another negative result; this time, it is “Negative Female’s” turn.

If everything went well, the training process should be running. Let’s check the terminal output.

Congratulations, you have created a machine learning training application in less than 200 lines!
Now we can call the model information endpoint:

At this point, the model can be downloaded using the URL. To test it, copy the URL and paste it in the browser. You should see how the model starts downloading.
Dockerizing and Deploying the App
With Docker, the deployment becomes very easy. With no changes or few changes, you can deploy your app to several platforms. We will use Ubuntu as a base, create a Docker file on top of the app folder, and put this inside:
FROM ubuntu:16.04

RUN apt-get update
RUN apt-get install libstdc++6 -y
RUN apt-get install liblapack3 -y
RUN apt-get install libblas3 -y
RUN apt-get install python3-pip -y
RUN pip3 install gunicorn
RUN pip3 install -U turicreate==4.3.1
RUN pip3 install flask-uploads
RUN pip3 install Flask-SQLAlchemy
RUN pip3 install flask-marshmallow
RUN pip3 install marshmallow-sqlalchemy

# Add our code
COPY ./app /app
WORKDIR ./app

ENV LC_ALL=C.UTF-8
ENV LANG=C.UTF-8

EXPOSE 80

# Run the app.  CMD is required to run the app
CMD gunicorn --bind 0.0.0.0:80 --timeout=260 app:app
The libraries in the Dockerfile are required by Turi Create to run on Linux. While Flask has its own server, it was not designed to run in a production environment. “Gunicorn,” on the other hand, is a production-ready web server.
Deployment to an AWS Beanstalk.
There are a lot of advantages of using Docker; one of them is that you can deploy the application very easily to different platforms. For this example, though, we will just be using AWS Beanstalk. To do this, create an AWS account and follow the following instructions:
1. Open the Elastic Beanstalk console and click on the button Create a new Application.
2. Once the environment is ready, click Create environment in the action menu.
3. For the environment, select Web Server Environment.

4. Enter the environment name (or you can leave the default) and leave the domain blank.

5. In Platform, select Docker.
6. In the Application code section, upload the code available in the repo in a zip file. If you are using a Mac, use “finder” to select all the files, open the context menu (right click) and choose compress.


7. Click Create environment.
8. The environment will be created and deployed automatically; once the process is done, click on the environment and make sure the health of the environment is ok.
9. Find the application URL and click on it. If you get the message “{“error”:”not found”},” everything is ready.
Conclusion
In this project, we faced some interesting challenges. Choosing the right tool for training models was a nice experience; we tested a lot of different tools because we wanted to see what all the various options had to offer. Some of the tools we considered and tested were Amazon SageMaker, Watson Machine Learning, NVIDIA DIGITS, Firebase ML (currently in beta) and Azure Machine Learning. In the end, we decided to use Turi Create due to its integration with Core ML, and also because it can train models without requiring a GPU for image classification.
We are aware that we can improve the accuracy of our face recognition app, which is why we are planning to test other training approaches. Apple’s recently-revealed “Create ML” seems like a good possibility, and there will surely be a follow-up to this blog post if we give it a try.

