Software Automation Frameworks Part I: CasperJS and PhantomJS
This is post 1 of 1 in the series “Software Automation Frameworks”
In this series of blog posts, I will describe my experiences with a number of software automation testing frameworks: InternJS, Karma, Lettuce, Mocha, NightwatchJS, Protractor, Watir, Webdriver.IO, and Jasmine. This first post is about CasperJS technologies.
CasperJS is a WebKit for web test automation. It works with JavaScript APIs that use different web browsers like Chrome, Firefox, Safari, etc. In addition, with CasperJS, you can automatically monitor network traffic in order to get some very helpful metrics.
CasperJS is written in JavaScript. A CasperJS test execution uses a “headless browser” (a web browser with no graphical user interface). Headless browsers are executed via the command line interface. When compared to a real browser, the main advantage of headless browser test execution is performance time. However, as the test is not running on a real browser, it’s difficult to simulate the behavior of real users. It is also not possible to debug the code when using this kind of browser.
I chose CasperJS for my first blog post because I’m a huge fan of Node.js frameworks, and I wanted to try test frameworks using a headless browser.
My experience using CasperJS was based on the following points:
What I liked:
- The installation was very simple and straightforward.
- I found a lot of documentation on CasperJS.
- Coding is relatively easy if you know JavaScript.
- The test executions were faster thanks to the command line application.
- The test report provided helpful metrics regarding run time and test results.
What I didn’t like:
- It was not possible to debug inconsistent failures in the locating elements due to the fact that the page loaded too quickly.
- It was difficult to verify what was happening during the test execution because a visible browser was not displayed.
Setup
CasperJS runs using the Nod.js framework. So, having Node.js installed is a prerequisite. Here are the installation steps:
- Open your terminal.
- Run the following command: brew install node

- Run the following command: “npm update -g npm”

- Verify if the installation was successful by running the following command: “node –version”

After installing Nod, we then need to install PhantomJS because it is the core runner for CasperJS. Here are the installation steps:
- To install PhantomJS with all its dependencies, run the following command in your terminal:

- Verify if the installation was successful by running the following command:

Installation
To install CasperJS with all its dependencies, run the following command in your terminal: s
Verify if the installation was successful by running the following command: 
First CasperJS Test Script
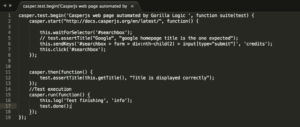
Here is the test that we wrote for the CasperJS code:
- Wait for the “search” button to be displayed
- Enter your search criteria into the search text field
- Click the “submit” button
- Verify if the web title you are searching for is displayed
casper.test.begin('Casperjs web page automated by Gorilla Logic ', function suite(test) { casper.start("http://docs.casperjs.org/en/latest/", function() { this.waitForSelector('#searchbox'); // test.assertTitle("Google", "google homepage title is the one expected"); this.sendKeys('#searchbox > form > div:nth-child(2) > input[type="submit"]', 'credits'); this.click('#searchbox'); }); casper.then(function() { test.assertTitle(this.getTitle(), "Title is displayed correctly"); }); //Test execution casper.run(function() { this.log('Test finishing', 'info'); test.done(); }); });
You can download the code here.
Explaining the Code
casper.test.begin('Casperjs web page automated by Gorilla Logic ', function suite(test) {
- Casper.test.begin is a test module and test class used for functional tests and unit tests and is very useful for assertions and test prototypes.
casper.start("http://docs.casperjs.org/en/latest/", function() {
- Casper.start launches a new browser instance and directs it to the URL included as a parameter.
this.waitForSelector('#searchbox'); // test.assertTitle("Google", "google homepage title is the one expected"); this.sendKeys('#searchbox > form > div:nth-child(2) > input[type="submit"]', 'credits'); this.click('#searchbox'); });
- Line #4 (1): Wait for the ‘#searchbox’ selector to be displayed.
- Line #6 (2): Enter the “credits” into the textbox.
- Line #7 (3): Press the button ‘#searchbox’.
casper.then(function() { test.assertTitle(this.getTitle(), "Title is displayed correctly"); });
Run the assertion method to verify if the title is displayed correctly.
//Test execution casper.run(function() { this.log('Test finishing', 'info'); test.done(); }); });
Execute the test and invoke the test log method.
Instructions for CasperJS
Code editor:
I recommend using Sublime Text to write your first automation code. You can download the application here: https://www.sublimetext.com
Step I: Open the Sublime Text app

Step II: Copy and paste from here into new Sublime Text file
Step III: Save the file as “sample.js”

Step IV: Open your terminal and go to the folder where “sample.js” was saved
Step V: Run the following command in your terminal: “casperjs test sample.js”

Step VI: Verify if the test execution was successful

CasperJS vs Selenium Webdriver – Test Duration
I wanted to finish this first blog by sharing some metrics with you regarding the difference in test execution time when using CasperJS vs. Selenium.
Selenium is a web framework for developing automation applications using different programming languages such as C#, Java, Python, etc. The same test that we developed for CasperJS was also applied to the Selenium web driver in order to compare the text execution time for each framework.
Upon comparison, the test execution for CasperJS lasted 4.9 seconds, while the one for the Selenium web driver was 87 seconds.
With CasperJS, we saved 82 seconds of execution time, which is a testament to the great performance of our CasperJS code.

- Test execution from Selenium web driver using maven project

Conclusions
- The test execution time for CasperJS was much faster than that of the Selenium web driver.
- Writing the code was very easy and updating the code for maintenance is simple.
- The installation of CasperJS and PhantomJS is relatively straightforward.
My recommendation would be to use CasperJS and PhantomJS for smoke test automation and not for regression test automation.
Stay tuned for the next automation blog post on Webdriver.IO.